
You may have heard of data models. Maybe you haven’t.
Regardless:
Data models are a high-level topic that you’ll see thrown around. Sometimes, people claim them to be a utopian solution. Other times, people describe them as an incredibly complex topic.
We will help you understand Splunk data models and provide use cases to show how these models could be helpful to you.
Why You Should Use Splunk Data Models
Data models provide an easy way to view and search your data from multiple log sources.
As you continue your Splunk journey and ingest more data, you will find that different data follows a general pattern.
You may have firewall logs showing network traffic with source and destination addresses communicating back and forth. Or, you may have a host-based IDS system.
You could have remote desktop RDP logs. Or you could have SQL servers providing authentication logs. The list could go on and on.
So:
You could have all these different logs; as a general rule, they follow a general principle. They’re all network traffic and authentication logs; you will search each category similarly.
And that’s where data models fit in.
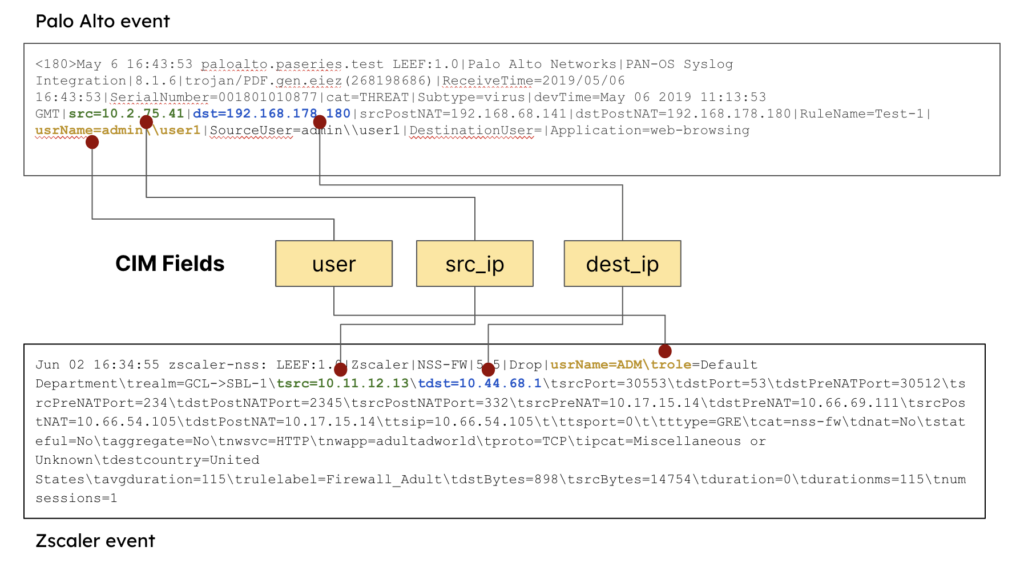
These logs can come in all shapes and sizes. For instance, take a look at an example Palo Alto event payload:
<180>May 6 16:43:53 paloalto.paseries.test LEEF:1.0|Palo Alto Networks|PAN-OS Syslog Integration|8.1.6|trojan/PDF.gen.eiez(268198686)|ReceiveTime=2019/05/06 16:43:53|SerialNumber=001801010877|cat=THREAT|Subtype=virus|devTime=May 06 2019 11:13:53 GMT|src=10.2.75.41|dst=192.168.178.180|srcPostNAT=192.168.68.141|dstPostNAT=192.168.178.180|RuleName=Test-1|usrName=admin\\user1|SourceUser=admin\\user1|DestinationUser=|Application=web-browsing|VirtualSystem=vsys1|SourceZone=INSIDE-ZN|DestinationZone=OUTSIDE-ZN|IngressInterface=ethernet1/1|EgressInterface=ethernet1/3|LogForwardingProfile=testForwarder|SessionID=3012|RepeatCount=1|srcPort=63508|dstPort=80|srcPostNATPort=31539|dstPostNATPort=80|Flags=0x406000|proto=tcp|action=alert|Miscellaneous=\"example.test/UG_FAQ.pdf\"|ThreatID=trojan/PDF.eiez(268198686)|URLCategory=educational-institutions|sev=3|Severity=medium|Direction=server-to-client|sequence=486021038|ActionFlags=0xa000000000000000|SourceLocation=10.0.0.0-10.255.255.255|DestinationLocation=testPlace|ContentType=|PCAP_ID=0|FileDigest=|Cloud=|URLIndex=5|RequestMethod=|Subject=|DeviceGroupHierarchyL1=12|DeviceGroupHierarchyL2=0|DeviceGroupHierarchyL3=0|DeviceGroupHierarchyL4=0|vSrcName=|DeviceName=testName|SrcUUID=|DstUUID=|TunnelID=0|MonitorTag=|ParentSessionID=0|ParentStartTime=|TunnelType=N/A|ThreatCategory=pdf|ContentVer=Antivirus-2969-3479We’ve bolded useful fields. In nearly every case, you’ll require the source IP address, destination IP address, and username fields to investigate malicious activity.
Now:
Imagine working with dozens of unique payloads from unique log sources like we described earlier. You may have multiple firewalls. The source and destination IP address field sometimes begins with dst or src.
An example Zscaler event log will prove this:
Jun 02 16:34:55 zscaler-nss: LEEF:1.0|Zscaler|NSS-FW|5.5|Drop|usrName=ADM\trole=Default Department\trealm=GCL->SBL-1\tsrc=10.11.12.13\tdst=10.44.68.1\tsrcPort=30553\tdstPort=53\tdstPreNATPort=30512\tsrcPreNATPort=234\tdstPostNATPort=2345\tsrcPostNATPort=332\tsrcPreNAT=10.17.15.14\tdstPreNAT=10.66.69.111\tsrcPostNAT=10.66.54.105\tdstPostNAT=10.17.15.14\ttsip=10.66.54.105\t\ttsport=0\t\tttype=GRE\tcat=nss-fw\tdnat=No\tstateful=No\taggregate=No\tnwsvc=HTTP\tnwapp=adultadworld\tproto=TCP\tipcat=Miscellaneous or Unknown\tdestcountry=United States\tavgduration=115\trulelabel=Firewall_Adult\tdstBytes=898\tsrcBytes=14754\tduration=0\tdurationms=115\tnumsessions=1Notice tsrc and tdst rather than src and dst signify the source and destination addresses compared to the Palo Alto event.
This is where Data Models come into play. Building detection rules and searches compatible with dozens of unique log sources requires using these models to create a standard format focused on extracting value from data and mapping the values to standardized fields.
Splunk Common Information Model (CIM)
The Splunk Common Information Model is the under-the-hood component of data models. In other words, the structure and reusable fields connect payloads to data models.
By default, Splunk ES does not come with the common information model. It installs via an add-on. This CIM contains a collection of pre-configured data models used to enhance your Splunk search experience.
For a single-page view of all Splunk CIM fields, visit the Splunk support site.
The CIM exists to help you normalize many data source types into a common standard. We provided an example with Palo Alto and ZScaler earlier. In that example, the CIM fields are user, src_ip and dest_ip.
Increasing Data Model Performance
You’ll want to focus on configuring the constraints to increase searching performance with data models.
We don’t want Splunk looking across every index when constructing data models. It’s not efficient.
So:
Splunk has created constraints and built them into data models to filter certain indexes.
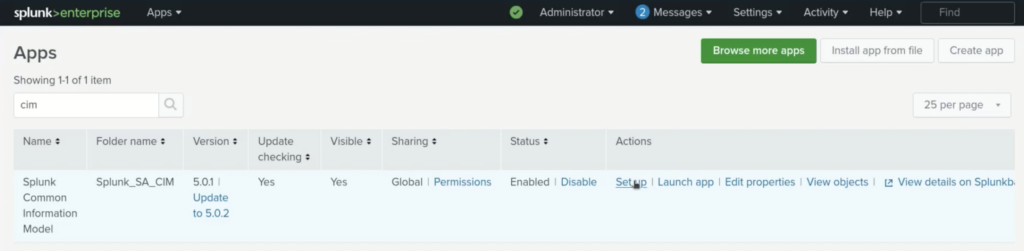
Go to apps -> manage apps -> and search for CIM.
Under actions click setup.
In this example, we’ll modify the Network Traffic data model.
Click on Network Traffic and look for Indexes Whitelist.
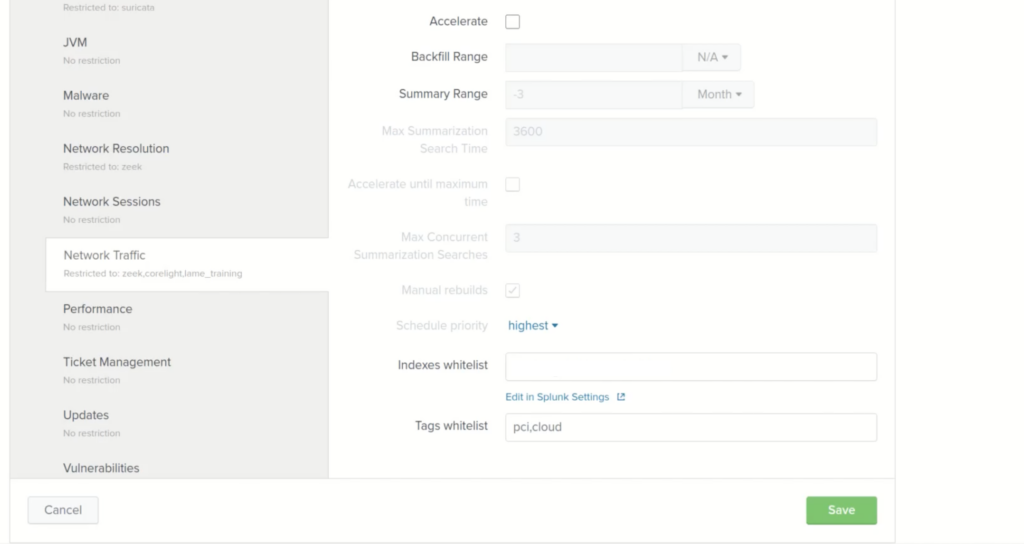
You’ll want to enter the indexes where your network traffic is stored for this field. This will restrict the data model to only look at those indexes.
These index constraints prevent the Splunk Platform from searching across all stored data and focus only on the relevant indexes.
If you leave this field blank, the data model will search every index. This will result in slow performance.
